Utiliser des bases de données conteneurisées
L'utilisation d'une base de données conteneurisée locale offre flexibilité et facilité de configuration, vous permettant de refléter fidèlement les environnements de production sans les frais généraux des installations de bases de données traditionnelles. Docker simplifie ce processus, vous permettant de déployer, gérer et mettre à l'échelle des bases de données dans des conteneurs isolés avec seulement quelques commandes.
Dans ce guide, vous apprendrez à :
- Exécuter une base de données conteneurisée locale
- Accéder au shell d'une base de données conteneurisée
- Vous connecter à une base de données conteneurisée depuis votre hôte
- Vous connecter à une base de données conteneurisée depuis un autre conteneur
- Persister les données de la base de données dans un volume
- Construire une image de base de données personnalisée
- Utiliser Docker Compose pour exécuter une base de données
Ce guide utilise l'image MySQL pour les exemples, mais les concepts peuvent être appliqués à d'autres images de bases de données.
Prérequis
Pour suivre ce guide, vous devez avoir Docker installé. Pour installer Docker, consultez Obtenir Docker.
Exécuter une base de données conteneurisée locale
La plupart des systèmes de bases de données populaires, y compris MySQL, PostgreSQL et MongoDB, ont une image officielle Docker disponible sur Docker Hub. Ces images sont un ensemble d'images sélectionnées qui suivent les meilleures pratiques, vous assurant d'avoir accès aux dernières fonctionnalités et mises à jour de sécurité. Pour commencer, visitez Docker Hub et recherchez la base de données qui vous intéresse. La page de chaque image fournit des instructions détaillées sur la façon d'exécuter le conteneur, de personnaliser votre configuration et de configurer la base de données selon vos besoins. Pour plus d'informations sur l'image MySQL utilisée dans ce guide, consultez la page de l'image MySQL sur Docker Hub.
Pour exécuter un conteneur de base de données, vous pouvez utiliser soit l'interface graphique de Docker Desktop, soit la CLI.
Pour exécuter un conteneur à l'aide de la CLI, exécutez la commande suivante dans un terminal :
$ docker run --name my-mysql -e MYSQL_ROOT_PASSWORD=my-secret-pw -e MYSQL_DATABASE=mydb -d mysql:latest
Dans cette commande :
--name my-mysqlattribue le nom my-mysql à votre conteneur pour une référence plus facile.-e MYSQL_ROOT_PASSWORD=my-secret-pwdéfinit le mot de passe root pour MySQL sur my-secret-pw. Remplacez my-secret-pw par un mot de passe sécurisé de votre choix.-e MYSQL_DATABASE=mydbcrée facultativement une base de données nommée mydb. Vous pouvez changer mydb pour le nom de base de données souhaité.-dexécute le conteneur en mode détaché, ce qui signifie qu'il s'exécute en arrière-plan.mysql:latestspécifie que vous voulez utiliser la dernière version de l'image MySQL.
Pour vérifier que votre conteneur est en cours d'exécution, exécutez docker ps dans un terminal.
Pour exécuter un conteneur à l'aide de l'interface graphique :
-
Dans le tableau de bord de Docker Desktop, sélectionnez la recherche globale en haut de la fenêtre.
-
Spécifiez
mysqldans le champ de recherche, et sélectionnez l'ongletImagess'il n'est pas déjà sélectionné. -
Passez la souris sur l'image
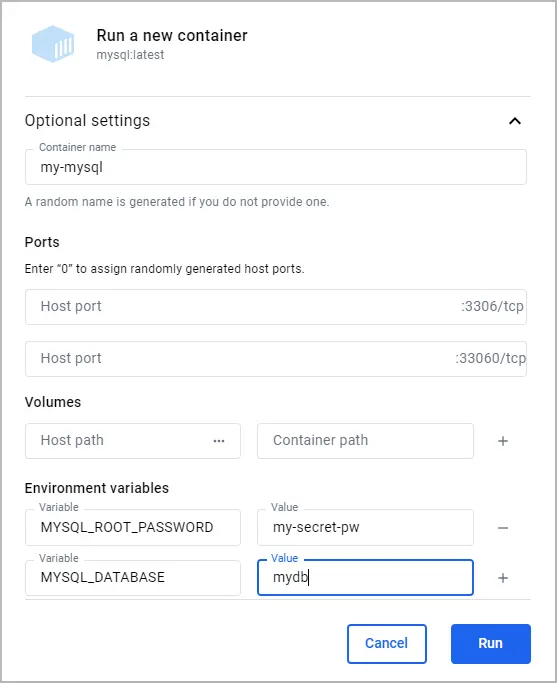
mysqlet sélectionnezExécuter. La fenêtre modale Exécuter un nouveau conteneur apparaît. -
Développez les Paramètres optionnels.
-
Dans les paramètres optionnels, spécifiez ce qui suit :
- Nom du conteneur :
my-mysql - Variables d'environnement :
MYSQL_ROOT_PASSWORD:my-secret-pwMYSQL_DATABASE:mydb
- Nom du conteneur :
-
Sélectionnez
Exécuter. -
Ouvrez la vue Conteneur dans le tableau de bord de Docker Desktop pour vérifier que votre conteneur est en cours d'exécution.
Accéder au shell d'une base de données conteneurisée
Lorsque vous avez une base de données qui s'exécute dans un conteneur Docker, vous pouvez avoir besoin d'accéder à son shell pour gérer la base de données, exécuter des commandes ou effectuer des tâches administratives. Docker fournit un moyen simple de le faire en utilisant la commande docker exec. De plus, si vous préférez une interface graphique, vous pouvez utiliser l'interface graphique de Docker Desktop.
Si vous n'avez pas encore de conteneur de base de données en cours d'exécution, consultez Exécuter une base de données conteneurisée locale.
Pour accéder au terminal d'un conteneur MySQL à l'aide de la CLI, vous pouvez utiliser la commande docker exec suivante.
$ docker exec -it my-mysql bash
Dans cette commande :
docker execindique à Docker que vous voulez exécuter une commande dans un conteneur en cours d'exécution.-itgarantit que le terminal auquel vous accédez est interactif, afin que vous puissiez y taper des commandes.my-mysqlest le nom de votre conteneur MySQL. Si vous avez nommé votre conteneur différemment lorsque vous l'avez exécuté, utilisez ce nom à la place.bashest la commande que vous voulez exécuter à l'intérieur du conteneur. Elle ouvre un shell bash qui vous permet d'interagir avec le système de fichiers et les applications installées du conteneur.
Après avoir exécuté cette commande, vous aurez accès au shell bash à l'intérieur de votre conteneur MySQL, à partir duquel vous pouvez gérer directement votre serveur MySQL. Vous pouvez exécuter exit pour retourner à votre terminal.
- Ouvrez le tableau de bord de Docker Desktop et sélectionnez la vue Conteneurs.
- Dans la colonne Actions de votre conteneur, sélectionnez Afficher les actions du conteneur, puis sélectionnez Ouvrir dans le terminal.
Dans ce terminal, vous pouvez accéder au shell à l'intérieur de votre conteneur MySQL, à partir duquel vous pouvez gérer directement votre serveur MySQL.
Une fois que vous avez accédé au terminal du conteneur, vous pouvez exécuter tous les outils disponibles dans ce conteneur. L'exemple suivant montre l'utilisation de mysql dans le conteneur pour lister les bases de données.
# mysql -u root -p
Enter password: my-secret-pw

mysql> SHOW DATABASES;

+--------------------+
| Database           |
+--------------------+
| information_schema |
| mydb               |
| mysql              |
| performance_schema |
| sys                |
+--------------------+
5 rows in set (0.00 sec)
Se connecter à une base de données conteneurisée depuis votre hôte
La connexion à une base de données conteneurisée depuis votre machine hôte implique le mappage d'un port à l'intérieur du conteneur vers un port sur votre machine hôte. Ce processus garantit que la base de données à l'intérieur du conteneur est accessible via le réseau de la machine hôte. Pour MySQL, le port par défaut est 3306. En exposant ce port, vous pouvez utiliser divers outils de gestion de base de données ou applications sur votre machine hôte pour interagir avec votre base de données MySQL.
Avant de commencer, vous devez supprimer tous les conteneurs que vous avez précédemment exécutés pour ce guide. Pour arrêter et supprimer un conteneur, soit :
- Dans un terminal, exécutez
docker rm --force my-mysqlpour supprimer le conteneur nommémy-mysql. - Ou, dans le tableau de bord de Docker Desktop, sélectionnez l'icône Supprimer à côté de votre conteneur dans la vue Conteneurs.
Ensuite, vous pouvez utiliser soit l'interface graphique de Docker Desktop, soit la CLI pour exécuter le conteneur avec le port mappé.
Exécutez la commande suivante dans un terminal.
$ docker run -p 3307:3306 --name my-mysql -e MYSQL_ROOT_PASSWORD=my-secret-pw -e MYSQL_DATABASE=mydb -d mysql:latest
In this command, -p 3307:3306 maps port 3307 on the host to port 3306 in the container.
To verify the port is mapped, run the following command.
$ docker ps
You should see output like the following.
CONTAINER ID   IMAGE          COMMAND                  CREATED          STATUS          PORTS                               NAMES
6eb776cfd73c   mysql:latest   "docker-entrypoint.s…"   17 minutes ago   Up 17 minutes   33060/tcp, 0.0.0.0:3307->3306/tcp   my-mysql
To run a container using the GUI:
-
In the Docker Desktop Dashboard, select the global search at the top of the window.
-
Specify
mysqlin the search box, and select theImagestab if not already selected. -
Hover over the
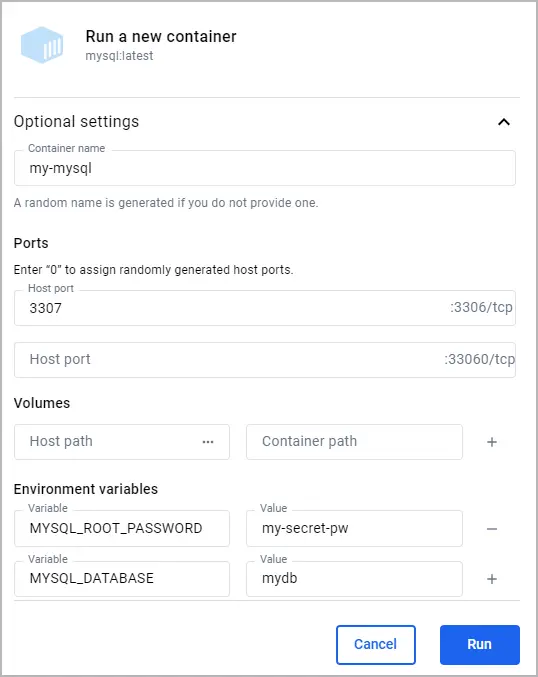
mysqlimage and selectRun. The Run a new container modal appears. -
Expand Optional settings.
-
In the optional settings, specify the following:
- Container name:
my-mysql - Host port for the 3306/tcp port:
3307 - Environment variables:
MYSQL_ROOT_PASSWORD:my-secret-pwMYSQL_DATABASE:mydb
- Container name:
-
Select
Run. -
In the Containers view, verify that the port is mapped under the Port(s) column. You should see 3307:3306 for the my-mysql container.
At this point, any application running on your host can access the MySQL service in the container at localhost:3307.
Connect to a containerized database from another container
Connecting to a containerized database from another container is a common scenario in microservices architecture and during development processes. Docker's networking capabilities make it easy to establish this connection without having to expose the database to the host network. This is achieved by placing both the database container and the container that needs to access it on the same Docker network.
Before you begin, you must remove any containers you previously ran for this guide. To stop and remove a container, either:
- In a terminal, run
docker remove --force my-mysqlto remove the container namedmy-mysql. - Or, in the Docker Desktop Dashboard, select the Delete icon next to your container in the Containers view.
To create a network and run containers on it:
-
Run the following command to create a Docker network named my-network.
$ docker network create my-network -
Run your database container and specify the network using the
--networkoption. This runs the container on the my-network network.$ docker run --name my-mysql -e MYSQL_ROOT_PASSWORD=my-secret-pw -e MYSQL_DATABASE=mydb --network my-network -d mysql:latest -
Run your other containers and specify the network using the
--networkoption. For this example, you'll run a phpMyAdmin container that can connect to your database.-
Run a phpMyAdmin container. Use the
--networkoption to specify the network, the-poption to let you access the container from your host machine, and the-eoption to specify a required environment variable for this image.$ docker run --name my-phpmyadmin -d --network my-network -p 8080:80 -e PMA_HOST=my-mysql phpmyadmin
-
-
Verify that the containers can communicate. For this example, you'll access phpMyAdmin and verify that it connects to the database.
- Open http://localhost:8080 to access your phpMyAdmin container.
- Log in using
rootas the username andmy-secret-pwas the password. You should connect to the MySQL server and see your database listed.
At this point, any application running on your my-network container network
can access the MySQL service in the container at my-mysql:3306.
Persist database data in a volume
Persisting database data in a Docker volume is necessary for ensuring that your data survives container restarts and removals. A Docker volume lets you store database files outside the container's writable layer, making it possible to upgrade the container, switch bases, and share data without losing it. Here's how you can attach a volume to your database container using either the Docker CLI or the Docker Desktop GUI.
Before you begin, you must remove any containers you previously ran for this guide. To stop and remove a container, either:
- In a terminal, run
docker remove --force my-mysqlto remove the container namedmy-mysql. - Or, in the Docker Desktop Dashboard, select the Delete icon next to your container in the Containers view.
Next, you can use either the Docker Desktop GUI or CLI to run the container with a volume.
To run your database container with a volume attached, include the -v option
with your docker run command, specifying a volume name and the path where the
database stores its data inside the container. If the volume doesn't exist,
Docker automatically creates it for you.
To run a database container with a volume attached, and then verify that the data persists:
-
Run the container and attach the volume.
$ docker run --name my-mysql -e MYSQL_ROOT_PASSWORD=my-secret-pw -e MYSQL_DATABASE=mydb -v my-db-volume:/var/lib/mysql -d mysql:latestThis command mounts the volume named
my-db-volumeto the/var/lib/mysqldirectory in the container. -
Create some data in the database. Use the
docker execcommand to runmysqlinside the container and create a table.$ docker exec my-mysql mysql -u root -pmy-secret-pw -e "CREATE TABLE IF NOT EXISTS mydb.mytable (column_name VARCHAR(255)); INSERT INTO mydb.mytable (column_name) VALUES ('value');"This command uses the
mysqltool in the container to create a table namedmytablewith a column namedcolumn_name, and finally inserts a value ofvalue. -
Stop and remove the container. Without a volume, the table you created would be lost when removing the container.
$ docker remove --force my-mysql -
Start a new container with the volume attached. This time, you don't need to specify any environment variables as the configuration is saved in the volume.
$ docker run --name my-mysql -v my-db-volume:/var/lib/mysql -d mysql:latest -
Verify that the table you created still exists. Use the
docker execcommand again to runmysqlinside the container.$ docker exec my-mysql mysql -u root -pmy-secret-pw -e "SELECT * FROM mydb.mytable;"This command uses the
mysqltool in the container to select all the records from themytabletable.You should see output like the following.
column_name
value
To run a database container with a volume attached, and then verify that the data persists:
-
Run a container with a volume attached.
-
In the Docker Desktop Dashboard, select the global search at the top of the window.
-
Specify
mysqlin the search box, and select the Images tab if not already selected. -
Hover over the mysql image and select Run. The Run a new container modal appears.
-
Expand Optional settings.
-
In the optional settings, specify the following:
- Container name:
my-mysql - Environment variables:
MYSQL_ROOT_PASSWORD:my-secret-pwMYSQL_DATABASE:mydb
- Volumes:
my-db-volume:/var/lib/mysql
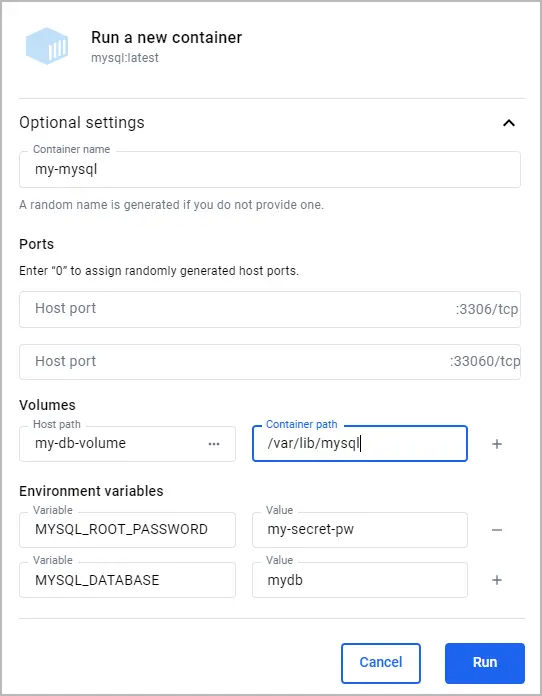
Here, the name of the volume is
my-db-volumeand it is mounted in the container at/var/lib/mysql. - Container name:
-
Select
Run.
-
-
Create some data in the database.
-
In the Containers view, next to your container select the Show container actions icon, and then select Open in terminal.
-
Run the following command in the container's terminal to add a table.
# mysql -u root -pmy-secret-pw -e "CREATE TABLE IF NOT EXISTS mydb.mytable (column_name VARCHAR(255)); INSERT INTO mydb.mytable (column_name) VALUES ('value');"This command uses the
mysqltool in the container to create a table namedmytablewith a column namedcolumn_name, and finally inserts a value of value`.
-
-
In the Containers view, select the Delete icon next to your container, and then select Delete forever. Without a volume, the table you created would be lost when deleting the container.
-
Run a container with a volume attached.
-
In the Docker Desktop Dashboard, select the global search at the top of the window.
-
Specify
mysqlin the search box, and select the Images tab if not already selected. -
Hover over the mysql image and select Run. The Run a new container modal appears.
-
Expand Optional settings.
-
In the optional settings, specify the following:
- Container name:
my-mysql - Environment variables:
MYSQL_ROOT_PASSWORD:my-secret-pwMYSQL_DATABASE:mydb
- Volumes:
my-db-volume:/var/lib/mysql
- Container name:
-
Select
Run.
-
-
Verify that the table you created still exists.
-
In the Containers view, next to your container select the Show container actions icon, and then select Open in terminal.
-
Run the following command in the container's terminal to verify that table you created still exists.
# mysql -u root -pmy-secret-pw -e "SELECT * FROM mydb.mytable;"This command uses the
mysqltool in the container to select all the records from themytabletable.You should see output like the following.
column_name
value
-
At this point, any MySQL container that mounts the my-db-volume will be able
to access and save persisted data.
Build a customized database image
Customizing your database image lets you include additional configuration, scripts, or tools alongside the base database server. This is particularly useful for creating a Docker image that matches your specific development or production environment needs. The following example outlines how to build and run a custom MySQL image that includes a table initialization script.
Before you begin, you must remove any containers you previously ran for this guide. To stop and remove a container, either:
- In a terminal, run
docker remove --force my-mysqlto remove the container namedmy-mysql. - Or, in the Docker Desktop Dashboard, select the Delete icon next to your container in the Containers view.
To build and run your custom image:
-
Create a Dockerfile.
-
Create a file named
Dockerfilein your project directory. For this example, you can create theDockerfilein an empty directory of your choice. This file will define how to build your custom MySQL image. -
Add the following content to the
Dockerfile.# syntax=docker/dockerfile:1 # Use the base image mysql:latest FROM mysql:latest # Set environment variables ENV MYSQL_DATABASE mydb # Copy custom scripts or configuration files from your host to the container COPY ./scripts/ /docker-entrypoint-initdb.d/In this Dockerfile, you've set the environment variable for the MySQL database name. You can also use the
COPYinstruction to add custom configuration files or scripts into the container. In this example, files from your host's./scripts/directory are copied into the container's/docker-entrypoint-initdb.d/directory. In this directory,.sh,.sql, and.sql.gzscripts are executed when the container is started for the first time. For more details about Dockerfiles, see the Dockerfile reference. -
Create a script file to initialize a table in the database. In the directory where your
Dockerfileis located, create a subdirectory namedscripts, and then create a file namedcreate_table.sqlwith the following content.
CREATE TABLE IF NOT EXISTS mydb.myothertable (
  column_name VARCHAR(255)
);

INSERT INTO mydb.myothertable (column_name) VALUES ('other_value');
You should now have the following directory structure.
├── your-project-directory/ │ ├── scripts/ │ │ └── create_table.sql │ └── Dockerfile -
-
Build your image.
-
In a terminal, change directory to the directory where your
Dockerfileis located. -
Run the following command to build the image.
$ docker build -t my-custom-mysql .In this command,
-t my-custom-mysqltags (names) your new image asmy-custom-mysql. The period (.) at the end of the command specifies the current directory as the context for the build, where Docker looks for the Dockerfile and any other files needed for the build.
-
-
Run your image as you did in Run a local containerized database. This time, specify your image's name instead of
mysql:latest. Also, you no longer need to specify theMYSQL_DATABASEenvironment variable as it's now defined by your Dockerfile.$ docker run --name my-mysql -e MYSQL_ROOT_PASSWORD=my-secret-pw -d my-custom-mysql -
Verify that your container is running with the following command.
$ docker psYou should see output like the following.
CONTAINER ID IMAGE COMMAND CREATED STATUS PORTS NAMES f74dcfdb0e59 my-custom-mysql "docker-entrypoint.s…" 2 hours ago Up 51 minutes 3306/tcp, 33060/tcp my-mysql -
Verify that your initialization script was ran. Run the following command in a terminal to show the contents of the
myothertabletable.$ docker exec my-mysql mysql -u root -pmy-secret-pw -e "SELECT * FROM mydb.myothertable;"You should see output like the following.
column_name
other_value
Any container ran using your my-custom-mysql image will have the table
initialized when first started.
Use Docker Compose to run a database
Docker Compose is a tool for defining and running multi-container Docker applications. With a single command, you can configure all your application's services (like databases, web apps, etc.) and manage them. In this example, you'll create a Compose file and use it to run a MySQL database container and a phpMyAdmin container.
To run your containers with Docker Compose:
-
Create a Docker Compose file.
-
Create a file named
compose.yamlin your project directory. This file will define the services, networks, and volumes. -
Add the following content to the
compose.yamlfile.services: db: image: mysql:latest environment: MYSQL_ROOT_PASSWORD: my-secret-pw MYSQL_DATABASE: mydb ports: - 3307:3306 volumes: - my-db-volume:/var/lib/mysql phpmyadmin: image: phpmyadmin/phpmyadmin:latest environment: PMA_HOST: db PMA_PORT: 3306 MYSQL_ROOT_PASSWORD: my-secret-pw ports: - 8080:80 depends_on: - db volumes: my-db-volume:For the database service:
dbis the name of the service.image: mysql:latestspecifies that the service uses the latest MySQL image from Docker Hub.environmentlists the environment variables used by MySQL to initialize the database, such as the root password and the database name.portsmaps port 3307 on the host to port 3306 in the container, allowing you to connect to the database from your host machine.volumesmountsmy-db-volumeto/var/lib/mysqlinside the container to persist database data.
In addition to the database service, there is a phpMyAdmin service. By default Compose sets up a single network for your app. Each container for a service joins the default network and is both reachable by other containers on that network, and discoverable by the service's name. Therefore, in the
PMA_HOSTenvironment variable, you can specify the service name,db, in order to connect to the database service. For more details about Compose, see the Compose file reference.
-
-
Run Docker Compose.
-
Open a terminal and change directory to the directory where your
compose.yamlfile is located. -
Run Docker Compose using the following command.
$ docker compose upYou can now access phpMyAdmin at http://localhost:8080 and connect to your database using
rootas the username andmy-secret-pwas the password. -
To stop the containers, press
ctrl+cin the terminal.
-
Now, with Docker Compose you can start your database and app, mount volumes, configure networking, and more, all with a single command.
Summary
This guide introduced you to the essentials of using containerized databases, specifically focusing on MySQL, to enhance flexibility, ease of setup, and consistency across your development environments. The use-cases covered in this guide not only streamline your development workflows but also prepare you for more advanced database management and deployment scenarios, ensuring your data-driven applications remain robust and scalable.
Related information: