Déployer des services dans un swarm
Les services swarm utilisent un modèle déclaratif, ce qui signifie que vous définissez l' état désiré du service et vous comptez sur Docker pour maintenir cet état. L' état inclut des informations telles que (mais sans s'y limiter) :
- Le nom et le tag de l'image que les conteneurs de service doivent exécuter
- Combien de conteneurs participent au service
- Si des ports sont exposés aux clients extérieurs au swarm
- Si le service doit démarrer automatiquement lorsque Docker démarre
- Le comportement spécifique qui se produit lorsque le service est redémarré (comme si un redémarrage en continu est utilisé)
- Caractéristiques des nœuds où le service peut s'exécuter (comme les contraintes de ressources et les préférences de placement)
Pour un aperçu du mode Swarm, voir Concepts clés du mode Swarm. Pour un aperçu de la façon dont les services fonctionnent, voir Comment fonctionnent les services.
Créer un service
Pour créer un service à une seule réplique sans configuration supplémentaire, vous n'avez besoin que de fournir le nom de l'image. Cette commande démarre un service Nginx avec un nom généré aléatoirement et aucun port publié. C'est un exemple naïf, puisque vous ne pouvez pas interagir avec le service Nginx.
$ docker service create nginx
Le service est planifié sur un nœud disponible. Pour confirmer que le service
a été créé et démarré avec succès, utilisez la commande docker service ls :
$ docker service ls

ID                  NAME                MODE                REPLICAS            IMAGE                                                                                             PORTS
a3iixnklxuem        quizzical_lamarr    replicated          1/1                 docker.io/library/nginx@sha256:41ad9967ea448d7c2b203c699b429abe1ed5af331cd92533900c6d77490e0268
Les services créés ne s'exécutent pas toujours immédiatement. Un service peut être dans un état en attente si son image n'est pas disponible, si aucun nœud ne répond aux exigences que vous configurez pour le service, ou pour d'autres raisons. Voir Services en attente pour plus d'informations.
Pour fournir un nom à votre service, utilisez le flag --name :
$ docker service create --name my_web nginx
Tout comme avec les conteneurs autonomes, vous pouvez spécifier une commande que les
conteneurs du service doivent exécuter, en l'ajoutant après le nom de l'image. Cet exemple
démarre un service appelé helloworld qui utilise une image alpine et exécute la
commande ping docker.com :
$ docker service create --name helloworld alpine ping docker.com
Vous pouvez également spécifier un tag d'image pour que le service l'utilise. Cet exemple modifie
le précédent pour utiliser le tag alpine:3.6 :
$ docker service create --name helloworld alpine:3.6 ping docker.com
Pour plus de détails sur la résolution des tags d'image, voir Spécifier la version d'image que le service doit utiliser.
gMSA pour Swarm
NoteCet exemple ne fonctionne que pour un conteneur Windows.
Swarm permet désormais d'utiliser une configuration Docker comme spécification d'identifiant gMSA - une exigence pour les applications authentifiées Active Directory. Cela réduit la charge de distribution des spécifications d'identifiants aux nœuds sur lesquels elles sont utilisées.
L'exemple suivant suppose qu'un gMSA et sa spécification d'identifiant (appelée credspec.json) existent déjà, et que les nœuds sur lesquels le déploiement est effectué sont correctement configurés pour le gMSA.
Pour utiliser une configuration comme spécification d'identifiant, créez d'abord la configuration Docker contenant la spécification d'identifiant :
$ docker config create credspec credspec.json
Maintenant, vous devriez avoir une configuration Docker nommée credspec, et vous pouvez créer un service utilisant cette spécification d'identifiant. Pour ce faire, utilisez le flag --credential-spec avec le nom de configuration, comme ceci :
$ docker service create --credential-spec="config://credspec" <votre image>
Votre service utilise la spécification d'identifiant gMSA lorsqu'il démarre, mais contrairement à une configuration Docker typique (utilisée en passant le flag --config), la spécification d'identifiant n'est pas montée dans le conteneur.
Créer un service en utilisant une image sur un registre privé
Si votre image est disponible sur un registre privé qui nécessite une connexion, utilisez le
flag --with-registry-auth avec docker service create, après vous être connecté. Si
votre image est stockée sur registry.example.com, qui est un registre privé, utilisez
une commande comme la suivante :
$ docker login registry.example.com

$ docker service  create \
  --with-registry-auth \
  --name my_service \
  registry.example.com/acme/my_image:latest
Cela transmet le jeton de connexion de votre client local aux nœuds swarm où le service est déployé, en utilisant les logs WAL chiffrés. Avec ces informations, les nœuds sont capables de se connecter au registre et de télécharger l'image.
Provide credential specs for managed service accounts
In Enterprise Edition 3.0, security is improved through the centralized distribution and management of Group Managed Service Account(gMSA) credentials using Docker config functionality. Swarm now allows using a Docker config as a gMSA credential spec, which reduces the burden of distributing credential specs to the nodes on which they are used.
NoteThis option is only applicable to services using Windows containers.
Credential spec files are applied at runtime, eliminating the need for host-based credential spec files or registry entries - no gMSA credentials are written to disk on worker nodes. You can make credential specs available to Docker Engine running swarm kit worker nodes before a container starts. When deploying a service using a gMSA-based config, the credential spec is passed directly to the runtime of containers in that service.
The --credential-spec must be in one of the following formats:
file://<filename>: The referenced file must be present in theCredentialSpecssubdirectory in the docker data directory, which defaults toC:\ProgramData\Docker\on Windows. For example, specifyingfile://spec.jsonloadsC:\ProgramData\Docker\CredentialSpecs\spec.json.registry://<value-name>: The credential spec is read from the Windows registry on the daemon's host.config://<config-name>: The config name is automatically converted to the config ID in the CLI. The credential spec contained in the specifiedconfigis used.
The following simple example retrieves the gMSA name and JSON contents from your Active Directory (AD) instance:
$ name="mygmsa"
$ contents="{...}"
$ echo $contents > contents.json
Make sure that the nodes to which you are deploying are correctly configured for the gMSA.
To use a config as a credential spec, create a Docker config in a credential spec file named credpspec.json.
You can specify any name for the name of the config.
$ docker config create --label com.docker.gmsa.name=mygmsa credspec credspec.json
Maintenant, vous pouvez créer un service utilisant cette spécification d'identifiant. Spécifiez le flag --credential-spec avec le nom de configuration :
$ docker service create --credential-spec="config://credspec" <votre image>
Votre service utilise la spécification d'identifiant gMSA lorsqu'il démarre, mais contrairement à une configuration Docker typique (utilisée en passant le flag --config), la spécification d'identifiant n'est pas montée dans le conteneur.
Mettre à jour un service
Vous pouvez changer presque tout concernant un service existant en utilisant la
commande docker service update. Lorsque vous mettez à jour un service, Docker arrête ses
conteneurs et les redémarre avec la nouvelle configuration.
Puisque Nginx est un service web, il fonctionne beaucoup mieux si vous publiez le port 80
aux clients extérieurs au swarm. Vous pouvez spécifier ceci lorsque vous créez le service,
en utilisant le flag -p ou --publish. Lors de la mise à jour d'un service existant, le flag
est --publish-add. Il y a aussi un flag --publish-rm pour supprimer un port qui
était précédemment publié.
En supposant que le service my_web de la section précédente existe toujours, utilisez
la commande suivante pour le mettre à jour afin de publier le port 80.
$ docker service update --publish-add 80 my_web
Pour vérifier que cela a fonctionné, utilisez docker service ls :
$ docker service ls

ID                  NAME                MODE                REPLICAS            IMAGE                                                                                             PORTS
4nhxl7oxw5vz        my_web              replicated          1/1                 docker.io/library/nginx@sha256:41ad9967ea448d7c2b203c699b429abe1ed5af331cd92533900c6d77490e0268   *:0->80/tcp
Pour plus d'informations sur le fonctionnement de la publication de ports, voir publier des ports.
Vous pouvez mettre à jour presque tous les détails de configuration d'un service existant, y compris le nom de l'image et le tag qu'il exécute. Voir Mettre à jour l'image d'un service après création.
Supprimer un service
Pour supprimer un service, utilisez la commande docker service remove. Vous pouvez supprimer un
service par son ID ou son nom, comme montré dans la sortie de la commande docker service ls.
La commande suivante supprime le service my_web.
$ docker service remove my_web
Service configuration details
The following sections provide details about service configuration. This topic does not cover every flag or scenario. In almost every instance where you can define a configuration at service creation, you can also update an existing service's configuration in a similar way.
See the command-line references for
docker service create and
docker service update, or run
one of those commands with the --help flag.
Configure the runtime environment
You can configure the following options for the runtime environment in the container:
- Environment variables using the
--envflag - The working directory inside the container using the
--workdirflag - The username or UID using the
--userflag
The following service's containers have an environment variable $MYVAR
set to myvalue, run from the /tmp/ directory, and run as the
my_user user.
$ docker service create --name helloworld \
  --env MYVAR=myvalue \
  --workdir /tmp \
  --user my_user \
  alpine ping docker.com
Update the command an existing service runs
To update the command an existing service runs, you can use the --args flag.
The following example updates an existing service called helloworld so that
it runs the command ping docker.com instead of whatever command it was running
before:
$ docker service update --args "ping docker.com" helloworld
Specify the image version a service should use
When you create a service without specifying any details about the version of
the image to use, the service uses the version tagged with the latest tag.
You can force the service to use a specific version of the image in a few
different ways, depending on your desired outcome.
An image version can be expressed in several different ways:
-
If you specify a tag, the manager (or the Docker client, if you use content trust) resolves that tag to a digest. When the request to create a container task is received on a worker node, the worker node only sees the digest, not the tag.
$ docker service create --name="myservice" ubuntu:16.04Some tags represent discrete releases, such as
ubuntu:16.04. Tags like this almost always resolve to a stable digest over time. It is recommended that you use this kind of tag when possible.Other types of tags, such as
latestornightly, may resolve to a new digest often, depending on how often an image's author updates the tag. It is not recommended to run services using a tag which is updated frequently, to prevent different service replica tasks from using different image versions. -
If you don't specify a version at all, by convention the image's
latesttag is resolved to a digest. Workers use the image at this digest when creating the service task.Thus, the following two commands are equivalent:
$ docker service create --name="myservice" ubuntu $ docker service create --name="myservice" ubuntu:latest -
If you specify a digest directly, that exact version of the image is always used when creating service tasks.
$ docker service create \
    --name="myservice" \
    ubuntu:16.04@sha256:35bc48a1ca97c3971611dc4662d08d131869daa692acb281c7e9e052924e38b1
When you create a service, the image's tag is resolved to the specific digest
the tag points to at the time of service creation. Worker nodes for that
service use that specific digest forever unless the service is explicitly
updated. This feature is particularly important if you do use often-changing tags
such as latest, because it ensures that all service tasks use the same version
of the image.
NoteIf content trust is enabled, the client actually resolves the image's tag to a digest before contacting the swarm manager, to verify that the image is signed. Thus, if you use content trust, the swarm manager receives the request pre-resolved. In this case, if the client cannot resolve the image to a digest, the request fails.
If the manager can't resolve the tag to a digest, each worker node is responsible for resolving the tag to a digest, and different nodes may use different versions of the image. If this happens, a warning like the following is logged, substituting the placeholders for real information.
unable to pin image <IMAGE-NAME> to digest: <REASON>To see an image's current digest, issue the command
docker inspect <IMAGE>:<TAG> and look for the RepoDigests line. The
following is the current digest for ubuntu:latest at the time this content
was written. The output is truncated for clarity.
$ docker inspect ubuntu:latest
"RepoDigests": [
    "ubuntu@sha256:35bc48a1ca97c3971611dc4662d08d131869daa692acb281c7e9e052924e38b1"
],
After you create a service, its image is never updated unless you explicitly run
docker service update with the --image flag as described below. Other update
operations such as scaling the service, adding or removing networks or volumes,
renaming the service, or any other type of update operation do not update the
service's image.
Update a service's image after creation
Each tag represents a digest, similar to a Git hash. Some tags, such as
latest, are updated often to point to a new digest. Others, such as
ubuntu:16.04, represent a released software version and are not expected to
update to point to a new digest often if at all. When you create a service, it
is constrained to create tasks using a specific digest of an image until you
update the service using service update with the --image flag.
When you run service update with the --image flag, the swarm manager queries
Docker Hub or your private Docker registry for the digest the tag currently
points to and updates the service tasks to use that digest.
NoteIf you use content trust, the Docker client resolves image and the swarm manager receives the image and digest, rather than a tag.
Usually, the manager can resolve the tag to a new digest and the service updates, redeploying each task to use the new image. If the manager can't resolve the tag or some other problem occurs, the next two sections outline what to expect.
If the manager resolves the tag
If the swarm manager can resolve the image tag to a digest, it instructs the worker nodes to redeploy the tasks and use the image at that digest.
-
If a worker has cached the image at that digest, it uses it.
-
If not, it attempts to pull the image from Docker Hub or the private registry.
-
If it succeeds, the task is deployed using the new image.
-
If the worker fails to pull the image, the service fails to deploy on that worker node. Docker tries again to deploy the task, possibly on a different worker node.
-
If the manager cannot resolve the tag
If the swarm manager cannot resolve the image to a digest, all is not lost:
-
The manager instructs the worker nodes to redeploy the tasks using the image at that tag.
-
If the worker has a locally cached image that resolves to that tag, it uses that image.
-
If the worker does not have a locally cached image that resolves to the tag, the worker tries to connect to Docker Hub or the private registry to pull the image at that tag.
-
If this succeeds, the worker uses that image.
-
If this fails, the task fails to deploy and the manager tries again to deploy the task, possibly on a different worker node.
-
Publish ports
When you create a swarm service, you can publish that service's ports to hosts outside the swarm in two ways:
-
You can rely on the routing mesh. When you publish a service port, the swarm makes the service accessible at the target port on every node, regardless of whether there is a task for the service running on that node or not. This is less complex and is the right choice for many types of services.
-
You can publish a service task's port directly on the swarm node where that service is running. This bypasses the routing mesh and provides the maximum flexibility, including the ability for you to develop your own routing framework. However, you are responsible for keeping track of where each task is running and routing requests to the tasks, and load-balancing across the nodes.
Keep reading for more information and use cases for each of these methods.
Publish a service's ports using the routing mesh
To publish a service's ports externally to the swarm, use the
--publish <PUBLISHED-PORT>:<SERVICE-PORT> flag. The swarm makes the service
accessible at the published port on every swarm node. If an external host
connects to that port on any swarm node, the routing mesh routes it to a task.
The external host does not need to know the IP addresses or internally-used
ports of the service tasks to interact with the service. When a user or process
connects to a service, any worker node running a service task may respond. For
more details about swarm service networking, see
Manage swarm service networks.
Example: Run a three-task Nginx service on 10-node swarm
Imagine that you have a 10-node swarm, and you deploy an Nginx service running three tasks on a 10-node swarm:
$ docker service create --name my_web \
                        --replicas 3 \
                        --publish published=8080,target=80 \
                        nginx
Three tasks run on up to three nodes. You don't need to know which nodes
are running the tasks; connecting to port 8080 on any of the 10 nodes
connects you to one of the three nginx tasks. You can test this using curl.
The following example assumes that localhost is one of the swarm nodes. If
this is not the case, or localhost does not resolve to an IP address on your
host, substitute the host's IP address or resolvable host name.
The HTML output is truncated:
$ curl localhost:8080

<!DOCTYPE html>
<html>
<head>
<title>Welcome to nginx!</title>
...truncated...
</html>
Subsequent connections may be routed to the same swarm node or a different one.
Publish a service's ports directly on the swarm node
Using the routing mesh may not be the right choice for your application if you
need to make routing decisions based on application state or you need total
control of the process for routing requests to your service's tasks. To publish
a service's port directly on the node where it is running, use the mode=host
option to the --publish flag.
NoteIf you publish a service's ports directly on the swarm node using
mode=hostand also setpublished=<PORT>this creates an implicit limitation that you can only run one task for that service on a given swarm node. You can work around this by specifyingpublishedwithout a port definition, which causes Docker to assign a random port for each task.In addition, if you use
mode=hostand you do not use the--mode=globalflag ondocker service create, it is difficult to know which nodes are running the service to route work to them.
Example: Run an nginx web server service on every swarm node
nginx is an open source reverse proxy, load balancer, HTTP cache, and a web server. If you run nginx as a service using the routing mesh, connecting to the nginx port on any swarm node shows you the web page for (effectively) a random swarm node running the service.
The following example runs nginx as a service on each node in your swarm and exposes nginx port locally on each swarm node.
$ docker service create \
  --mode global \
  --publish mode=host,target=80,published=8080 \
  --name=nginx \
  nginx:latest
You can reach the nginx server on port 8080 of every swarm node. If you add a node to the swarm, a nginx task is started on it. You cannot start another service or container on any swarm node which binds to port 8080.
NoteThis is a purely illustrative example. Creating an application-layer routing framework for a multi-tiered service is complex and out of scope for this topic.
Connect the service to an overlay network
You can use overlay networks to connect one or more services within the swarm.
First, create overlay network on a manager node using the docker network create
command with the --driver overlay flag.
$ docker network create --driver overlay my-network
After you create an overlay network in swarm mode, all manager nodes have access to the network.
You can create a new service and pass the --network flag to attach the service
to the overlay network:
$ docker service create \
  --replicas 3 \
  --network my-network \
  --name my-web \
  nginx
The swarm extends my-network to each node running the service.
You can also connect an existing service to an overlay network using the
--network-add flag.
$ docker service update --network-add my-network my-web
To disconnect a running service from a network, use the --network-rm flag.
$ docker service update --network-rm my-network my-web
For more information on overlay networking and service discovery, refer to Attach services to an overlay network and Docker swarm mode overlay network security model.
Grant a service access to secrets
To create a service with access to Docker-managed secrets, use the --secret
flag. For more information, see
Manage sensitive strings (secrets) for Docker services
Customize a service's isolation mode
ImportantThis setting applies to Windows hosts only and is ignored for Linux hosts.
Docker allows you to specify a swarm service's isolation mode. The isolation mode can be one of the following:
-
default: Use the default isolation mode configured for the Docker host, as configured by the-exec-optflag orexec-optsarray indaemon.json. If the daemon does not specify an isolation technology,processis the default for Windows Server, andhypervis the default (and only) choice for Windows 10. -
process: Run the service tasks as a separate process on the host.Noteprocessisolation mode is only supported on Windows Server. Windows 10 only supportshypervisolation mode. -
hyperv: Run the service tasks as isolatedhypervtasks. This increases overhead but provides more isolation.
You can specify the isolation mode when creating or updating a new service using
the --isolation flag.
Control service placement
Swarm services provide a few different ways for you to control scale and placement of services on different nodes.
-
You can specify whether the service needs to run a specific number of replicas or should run globally on every worker node. See Replicated or global services.
-
You can configure the service's CPU or memory requirements, and the service only runs on nodes which can meet those requirements.
-
Placement constraints let you configure the service to run only on nodes with specific (arbitrary) metadata set, and cause the deployment to fail if appropriate nodes do not exist. For instance, you can specify that your service should only run on nodes where an arbitrary label
pci_compliantis set totrue. -
Placement preferences let you apply an arbitrary label with a range of values to each node, and spread your service's tasks across those nodes using an algorithm. Currently, the only supported algorithm is
spread, which tries to place them evenly. For instance, if you label each node with a labelrackwhich has a value from 1-10, then specify a placement preference keyed onrack, then service tasks are placed as evenly as possible across all nodes with the labelrack, after taking other placement constraints, placement preferences, and other node-specific limitations into account.Unlike constraints, placement preferences are best-effort, and a service does not fail to deploy if no nodes can satisfy the preference. If you specify a placement preference for a service, nodes that match that preference are ranked higher when the swarm managers decide which nodes should run the service tasks. Other factors, such as high availability of the service, also factor into which nodes are scheduled to run service tasks. For example, if you have N nodes with the rack label (and then some others), and your service is configured to run N+1 replicas, the +1 is scheduled on a node that doesn't already have the service on it if there is one, regardless of whether that node has the
racklabel or not.
Replicated or global services
Swarm mode has two types of services: replicated and global. For replicated services, you specify the number of replica tasks for the swarm manager to schedule onto available nodes. For global services, the scheduler places one task on each available node that meets the service's placement constraints and resource requirements.
You control the type of service using the --mode flag. If you don't specify a
mode, the service defaults to replicated. For replicated services, you specify
the number of replica tasks you want to start using the --replicas flag. For
example, to start a replicated nginx service with 3 replica tasks:
$ docker service create \
  --name my_web \
  --replicas 3 \
  nginx
To start a global service on each available node, pass --mode global to
docker service create. Every time a new node becomes available, the scheduler
places a task for the global service on the new node. For example to start a
service that runs alpine on every node in the swarm:
$ docker service create \
  --name myservice \
  --mode global \
  alpine top
Service constraints let you set criteria for a node to meet before the scheduler
deploys a service to the node. You can apply constraints to the
service based upon node attributes and metadata or engine metadata. For more
information on constraints, refer to the docker service create
CLI reference.
Reserve memory or CPUs for a service
To reserve a given amount of memory or number of CPUs for a service, use the
--reserve-memory or --reserve-cpu flags. If no available nodes can satisfy
the requirement (for instance, if you request 4 CPUs and no node in the swarm
has 4 CPUs), the service remains in a pending state until an appropriate node is
available to run its tasks.
Out Of Memory Exceptions (OOME)
If your service attempts to use more memory than the swarm node has available, you may experience an Out Of Memory Exception (OOME) and a container, or the Docker daemon, might be killed by the kernel OOM killer. To prevent this from happening, ensure that your application runs on hosts with adequate memory and see Understand the risks of running out of memory.
Swarm services allow you to use resource constraints, placement preferences, and labels to ensure that your service is deployed to the appropriate swarm nodes.
Placement constraints
Use placement constraints to control the nodes a service can be assigned to. In
the following example, the service only runs on nodes with the
label region set
to east. If no appropriately-labelled nodes are available, tasks will wait in
Pending until they become available. The --constraint flag uses an equality
operator (== or !=). For replicated services, it is possible that all
services run on the same node, or each node only runs one replica, or that some
nodes don't run any replicas. For global services, the service runs on every
node that meets the placement constraint and any resource requirements.
$ docker service create \
  --name my-nginx \
  --replicas 5 \
  --constraint node.labels.region==east \
  nginx
You can also use the constraint service-level key in a compose.yaml
file.
If you specify multiple placement constraints, the service only deploys onto
nodes where they are all met. The following example limits the service to run on
all nodes where region is set to east and type is not set to devel:
$ docker service create \
  --name my-nginx \
  --mode global \
  --constraint node.labels.region==east \
  --constraint node.labels.type!=devel \
  nginx
You can also use placement constraints in conjunction with placement preferences and CPU/memory constraints. Be careful not to use settings that are not possible to fulfill.
For more information on constraints, refer to the docker service create
CLI reference.
Placement preferences
While placement constraints limit the nodes a service
can run on, placement preferences try to place tasks on appropriate nodes
in an algorithmic way (currently, only spread evenly). For instance, if you
assign each node a rack label, you can set a placement preference to spread
the service evenly across nodes with the rack label, by value. This way, if
you lose a rack, the service is still running on nodes on other racks.
Placement preferences are not strictly enforced. If no node has the label you specify in your preference, the service is deployed as though the preference were not set.
NotePlacement preferences are ignored for global services.
The following example sets a preference to spread the deployment across nodes
based on the value of the datacenter label. If some nodes have
datacenter=us-east and others have datacenter=us-west, the service is
deployed as evenly as possible across the two sets of nodes.
$ docker service create \
  --replicas 9 \
  --name redis_2 \
  --placement-pref 'spread=node.labels.datacenter' \
  redis:7.4.0
NoteNodes which are missing the label used to spread still receive task assignments. As a group, these nodes receive tasks in equal proportion to any of the other groups identified by a specific label value. In a sense, a missing label is the same as having the label with a null value attached to it. If the service should only run on nodes with the label being used for the spread preference, the preference should be combined with a constraint.
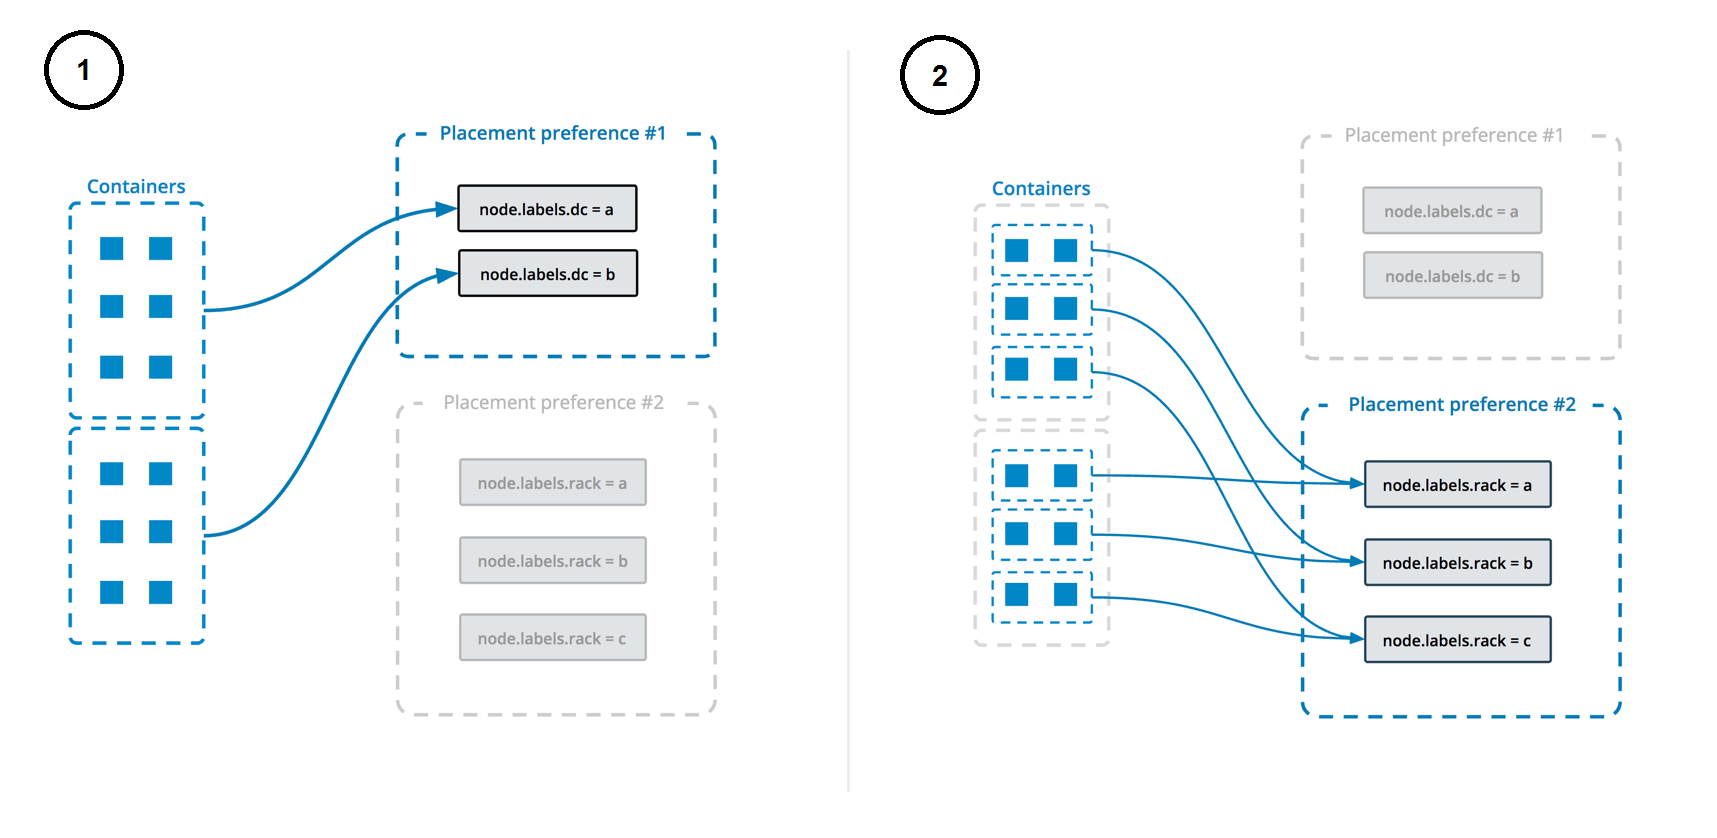
You can specify multiple placement preferences, and they are processed in the order they are encountered. The following example sets up a service with multiple placement preferences. Tasks are spread first over the various datacenters, and then over racks (as indicated by the respective labels):
$ docker service create \
  --replicas 9 \
  --name redis_2 \
  --placement-pref 'spread=node.labels.datacenter' \
  --placement-pref 'spread=node.labels.rack' \
  redis:7.4.0
You can also use placement preferences in conjunction with placement constraints or CPU/memory constraints. Be careful not to use settings that are not possible to fulfill.
This diagram illustrates how placement preferences work:
When updating a service with docker service update, --placement-pref-add
appends a new placement preference after all existing placement preferences.
--placement-pref-rm removes an existing placement preference that matches the
argument.
Configure a service's update behavior
When you create a service, you can specify a rolling update behavior for how the
swarm should apply changes to the service when you run docker service update.
You can also specify these flags as part of the update, as arguments to
docker service update.
The --update-delay flag configures the time delay between updates to a service
task or sets of tasks. You can describe the time T as a combination of the
number of seconds Ts, minutes Tm, or hours Th. So 10m30s indicates a 10
minute 30 second delay.
By default the scheduler updates 1 task at a time. You can pass the
--update-parallelism flag to configure the maximum number of service tasks
that the scheduler updates simultaneously.
When an update to an individual task returns a state of RUNNING, the scheduler
continues the update by continuing to another task until all tasks are updated.
If at any time during an update a task returns FAILED, the scheduler pauses
the update. You can control the behavior using the --update-failure-action
flag for docker service create or docker service update.
In the example service below, the scheduler applies updates to a maximum of 2
replicas at a time. When an updated task returns either RUNNING or FAILED,
the scheduler waits 10 seconds before stopping the next task to update:
$ docker service create \
  --replicas 10 \
  --name my_web \
  --update-delay 10s \
  --update-parallelism 2 \
  --update-failure-action continue \
  alpine
The --update-max-failure-ratio flag controls what fraction of tasks can fail
during an update before the update as a whole is considered to have failed. For
example, with --update-max-failure-ratio 0.1 --update-failure-action pause,
after 10% of the tasks being updated fail, the update is paused.
An individual task update is considered to have failed if the task doesn't
start up, or if it stops running within the monitoring period specified with
the --update-monitor flag. The default value for --update-monitor is 30
seconds, which means that a task failing in the first 30 seconds after it's
started counts towards the service update failure threshold, and a failure
after that is not counted.
Roll back to the previous version of a service
In case the updated version of a service doesn't function as expected, it's
possible to manually roll back to the previous version of the service using
docker service update's --rollback flag. This reverts the service
to the configuration that was in place before the most recent
docker service update command.
Other options can be combined with --rollback; for example,
--update-delay 0s, to execute the rollback without a delay between tasks:
$ docker service update \
  --rollback \
  --update-delay 0s
  my_web
You can configure a service to roll back automatically if a service update fails to deploy. See Automatically roll back if an update fails.
Manual rollback is handled at the server side, which allows manually-initiated
rollbacks to respect the new rollback parameters. Note that --rollback cannot
be used in conjunction with other flags to docker service update.
Automatically roll back if an update fails
You can configure a service in such a way that if an update to the service causes redeployment to fail, the service can automatically roll back to the previous configuration. This helps protect service availability. You can set one or more of the following flags at service creation or update. If you do not set a value, the default is used.
| Flag | Default | Description |
|---|---|---|
--rollback-delay |
0s |
Amount of time to wait after rolling back a task before rolling back the next one. A value of 0 means to roll back the second task immediately after the first rolled-back task deploys. |
--rollback-failure-action |
pause |
When a task fails to roll back, whether to pause or continue trying to roll back other tasks. |
--rollback-max-failure-ratio |
0 |
The failure rate to tolerate during a rollback, specified as a floating-point number between 0 and 1. For instance, given 5 tasks, a failure ratio of .2 would tolerate one task failing to roll back. A value of 0 means no failure are tolerated, while a value of 1 means any number of failure are tolerated. |
--rollback-monitor |
5s |
Duration after each task rollback to monitor for failure. If a task stops before this time period has elapsed, the rollback is considered to have failed. |
--rollback-parallelism |
1 |
The maximum number of tasks to roll back in parallel. By default, one task is rolled back at a time. A value of 0 causes all tasks to be rolled back in parallel. |
The following example configures a redis service to roll back automatically
if a docker service update fails to deploy. Two tasks can be rolled back in
parallel. Tasks are monitored for 20 seconds after rollback to be sure they do
not exit, and a maximum failure ratio of 20% is tolerated. Default values are
used for --rollback-delay and --rollback-failure-action.
$ docker service create --name=my_redis \
                        --replicas=5 \
                        --rollback-parallelism=2 \
                        --rollback-monitor=20s \
                        --rollback-max-failure-ratio=.2 \
                        redis:latest
Give a service access to volumes or bind mounts
For best performance and portability, you should avoid writing important data directly into a container's writable layer. You should instead use data volumes or bind mounts. This principle also applies to services.
You can create two types of mounts for services in a swarm, volume mounts or
bind mounts. Regardless of which type of mount you use, configure it using the
--mount flag when you create a service, or the --mount-add or --mount-rm
flag when updating an existing service. The default is a data volume if you
don't specify a type.
Data volumes
Data volumes are storage that exist independently of a container. The lifecycle of data volumes under swarm services is similar to that under containers. Volumes outlive tasks and services, so their removal must be managed separately. Volumes can be created before deploying a service, or if they don't exist on a particular host when a task is scheduled there, they are created automatically according to the volume specification on the service.
To use existing data volumes with a service use the --mount flag:
$ docker service create \
  --mount src=<VOLUME-NAME>,dst=<CONTAINER-PATH> \
  --name myservice \
  <IMAGE>
If a volume with the name <VOLUME-NAME> doesn't exist when a task is
scheduled to a particular host, then one is created. The default volume
driver is local. To use a different volume driver with this create-on-demand
pattern, specify the driver and its options with the --mount flag:
$ docker service create \
  --mount type=volume,src=<VOLUME-NAME>,dst=<CONTAINER-PATH>,volume-driver=<DRIVER>,volume-opt=<KEY0>=<VALUE0>,volume-opt=<KEY1>=<VALUE1>
  --name myservice \
  <IMAGE>
For more information on how to create data volumes and the use of volume drivers, see Use volumes.
Bind mounts
Bind mounts are file system paths from the host where the scheduler deploys the container for the task. Docker mounts the path into the container. The file system path must exist before the swarm initializes the container for the task.
The following examples show bind mount syntax:
-
To mount a read-write bind:
$ docker service create \ --mount type=bind,src=<HOST-PATH>,dst=<CONTAINER-PATH> \ --name myservice \ <IMAGE> -
To mount a read-only bind:
$ docker service create \
  --mount type=bind,src=<HOST-PATH>,dst=<CONTAINER-PATH>,readonly \
  --name myservice \
  <IMAGE>
ImportantBind mounts can be useful but they can also cause problems. In most cases, it is recommended that you architect your application such that mounting paths from the host is unnecessary. The main risks include the following:
If you bind mount a host path into your service's containers, the path must exist on every swarm node. The Docker swarm mode scheduler can schedule containers on any machine that meets resource availability requirements and satisfies all constraints and placement preferences you specify.
The Docker swarm mode scheduler may reschedule your running service containers at any time if they become unhealthy or unreachable.
Host bind mounts are non-portable. When you use bind mounts, there is no guarantee that your application runs the same way in development as it does in production.
Create services using templates
You can use templates for some flags of service create, using the syntax
provided by the Go's text/template
package.
The following flags are supported:
--hostname--mount--env
Valid placeholders for the Go template are:
| Placeholder | Description |
|---|---|
.Service.ID |
Service ID |
.Service.Name |
Service name |
.Service.Labels |
Service labels |
.Node.ID |
Node ID |
.Node.Hostname |
Node hostname |
.Task.Name |
Task name |
.Task.Slot |
Task slot |
Template example
This example sets the template of the created containers based on the service's name and the ID of the node where the container is running:
$ docker service create --name hosttempl \
                        --hostname="{{.Node.ID}}-{{.Service.Name}}"\
                         busybox top
To see the result of using the template, use the docker service ps and
docker inspect commands.
$ docker service ps va8ew30grofhjoychbr6iot8c

ID            NAME         IMAGE                                                                                   NODE          DESIRED STATE  CURRENT STATE               ERROR  PORTS
wo41w8hg8qan  hosttempl.1  busybox:latest@sha256:29f5d56d12684887bdfa50dcd29fc31eea4aaf4ad3bec43daf19026a7ce69912  2e7a8a9c4da2  Running        Running about a minute ago
$ docker inspect --format="{{.Config.Hostname}}" hosttempl.1.wo41w8hg8qanxwjwsg4kxpprj